A little catching up... We made these in December (I have made 50+ they are so simple)! But they are fun to make year-round for all occasions with any paper. I first spied these stars as a 4th of July decoration at the Crafty Crow, I wanted to have the kids more involved and have them year-round and for Christmas.
From using this tutorial, check out the super easy
******************************
This was the perfect winter
kid art project for a Saturday morning while Christmas music was playing in the
background. It had just started to snow at our house and my kids stayed in
their jammies (that’s what we call them) all morning, drawing and making a glitter
mess while drinking hot cocoa. I think they enjoyed this little star project
because they were able to project simple but fun ideas onto paper and then see
them hanging so beautifully in such a short amount of time.
This sparkly(you can't see the sparkle snow in the photo, but it's there!) art project was featured in one of my favorite issues of the
Simple {TUTORIAL}
2 white square sheets of card stock (any size)
markers – permanent markers work best (any drawing medium
will do)
Mod Podge & brush
snow glitter, sequins,
anything sparkly!
hot glue (fast drying/cooling) or strong all purpose glue
paper clips
hanging ribbon or string
- They can create any Winter Wonderland or Christmas design on paper that their heart desires! We used regular markers on stark white paper to create bright results. I think permanent works best because it doesn’t bleed when applying Mod Podge which is one of the steps towards the end of the process.
- Fold and crease each opposite corner, tip to tip, making a triangle. Open and repeat with the other two corners.
- Then flip over, fold and crease the straight sides of the square together. Open and repeat again with the top and bottom.
Your square should look like this, with four
creases.
- Cut along the fold just enough to then fold to form half of the star point. You can estimate the first cut and then keep track on a little paper for the rest of the cuts. Finish cutting all four sides and fold to the center, creating four star points.
Will look like this on the back side.
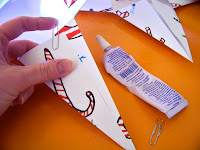
- The first time I uses a strong multipurpose glue to adhere the fold flaps together. But then I discovered that hot glue won't "pop off" paper in cold weather, and is faster. Secure with paper clips and let dry. Repeat this step with the remaining star flaps. Finish your other square by completing all the same steps so you will have two stars to decorate next!
- Throw some snow glitter on your stars! Of course, this is their favorite step, making a fun glitter mess! We got out the Christmas sequins, snow glitter and other sparkly paint and went to town! We used Mod Podge to adhere all of the shimmery stuff and then after I applied another layer of Mod Podge so it wouldn't flake off all over my house. Nothing is worse than finding glitter in all the wrong places!
- After completely drying. Hot glue the stars together and hang!
My kids had a messy art party creating artwork that we could
beautifully display through this Christmas and Winter season!
Here's how to make the stars, now go cut out some SNOWFLAKES using this tutorial!


No comments:
Post a Comment