Showing posts with label acrylic on tissue paper. Show all posts

September 20, 2013

Creating Your Own Painted Placemats {TUTORIAL}


I wanted to have my kids create table mats that could last a long time and remind them of "Family Good Times." So I asked them to think of a favorite family activity or a favorite food that we all enjoy. Then when they looked at them while sitting and eating at the dinner table they could remember the good experiences we have as a family! I also wanted them to create something with tissue paper (not achooo paper) and paint. I am completely obsessed with tissue paper and acrylic paint because the paint comes out so bright and colorful! I loved how these turned out, and I'm going to have my kids paint mine and hubby's too! This simple art project will last a long time for wonderful memories at the dinner table. 

This art project was featured in my favorite issue of The Sandbucket Issue 5 magazine. Visit Sandi's amazing blog at thesandbucket.com.


There are so many possibilities, so let's get started.


{TUTORIAL}

Materials Needed:


  • pencil & eraser
  • blacker permanent marker
  • white tissue paper (gift paper)
  • acrylic paint & brushes
  • 11 x 17" hot seal laminate pouches (found at a copy & print store)
  • clear glue stick (optional)


Step 1:  Draw with pencil first on the tissue paper (tip: draw very lightly so the paper won't rip if you want to erase).


Step 2:  Trace your pencil drawings with black permanent marker.


Step 3:  Paint your drawings (tip 1: Paint lightly, so you can see the black outline. tip 2: Don't let your paint be so thick that it makes the paper rip. Make sure the tissue paper is not sticking underneath onto the surface as it is drying.)


Step 4:  Cut (adult help) out the paintings from the  tissue paper and arrange on inside the pouch. (tip 1: Dab a very little amount of glue stick to the back side of each object so they won't move. tip 2: You can cut along the black lines tight, or you can leave it as a sheet of tissue paper like we did for our 2 1/2 year-old. tip 3: Touch up artwork with permanent marker.)


Arrange your creation however you like. I took ours back to the store where we bought them to be hot sealed because it was included in the price (I kept my receipt).


As you can see, just about any age can paint their own. She has a lot of fun using her fingers and hands to paint!


Ages 2, 7, and 10 years old


Bon Appetit - Eat up! 


March 25, 2013

Acrylic on Tissue Paper (not achooo! paper) DIY wall art {tutorial}


We started this kid art project with our amazing friends who live in Tabiona, UT.  We  made a smaller version of what I did with the first-graders, here is the post A Swarm of Sea Creatures! Tissue Paper & Paint {tutorial}. We had so much fun, most of us anyway, my son didn't want to start his until we returned home.  

I'm completely obsessed with tissue paper art right now. So you will be seeing another tissue project, but who knows when I'll be able to post it! It's family-inspired and will be featured in the next issue of the fabulous Sandbucket family magazine coming out in April!

I have good news! BABY #4 finally decided to arrived into the world March 13th, 2013! HE is a joy in our family and we are adjusting to the new addition. Our kids love him! 


Tissue Paper Art Tutorial

Materials Needed:
  • pencil & erasure
  • black permanent marker
  • white tissue paper (gift paper)
  • acrylic paint & brushes
  • pre-stretched and gessoed canvas
  • Mod Podge


  • I had the kids pick a theme or setting and go from there...


  • Draw with pencil first on the tissue paper (tip: pencil very lightly so the paper won't rip if you want to erase) and then trace with permanent marker.


  • Paint your drawings (tip #1: paint lightly, so you can see the black outline. tip #2: don't let your paint be so thick that it makes the paper rip. Make sure the tissue paper is not sticking underneath to surface as it is drying.)


2 DIFFERENT WAYS WE PREPARED & PAINTED OUR CANVAS:
You Can Choose!
  • 1- After you have painted your "shapes or drawings" on paper, it is easier to figure out your background on your canvas. The top canvas is acrylic painted directly onto canvas


  • 2- This canvas' surface & sides has been adhered (Mod Podge) with a layer of tissue paper first and now he is painting his background onto the tissue/canvas (gives it more texture).

  
  • Cut out the paintings from the tissue paper. You can cut along the black lines tight, or around the outside, leaving a "cloud" (You can see the finished artwork later in this post to see what I mean...) of tissue paper. (tip: touch up artwork with permanent marker before you start to adhere) 


  • Time to arrange their masterpiece before adhering to the canvas. 


  • I used a brush and applied a thin layer of Mod Podge to the canvas' surface first for each individually painted object, and then placed the object on top. (tip: let the paper lay/float itself down and then lightly spread out with your brush)
  • If you look closely, you can see that the tissue paper might by wrinkly in some areas. That's okay! Spread out as much as you can and then leave it alone to dry.
  • When objects are dry, add a thin layer of Mod Podge to seal and protect artwork. Add another layer if desired. 


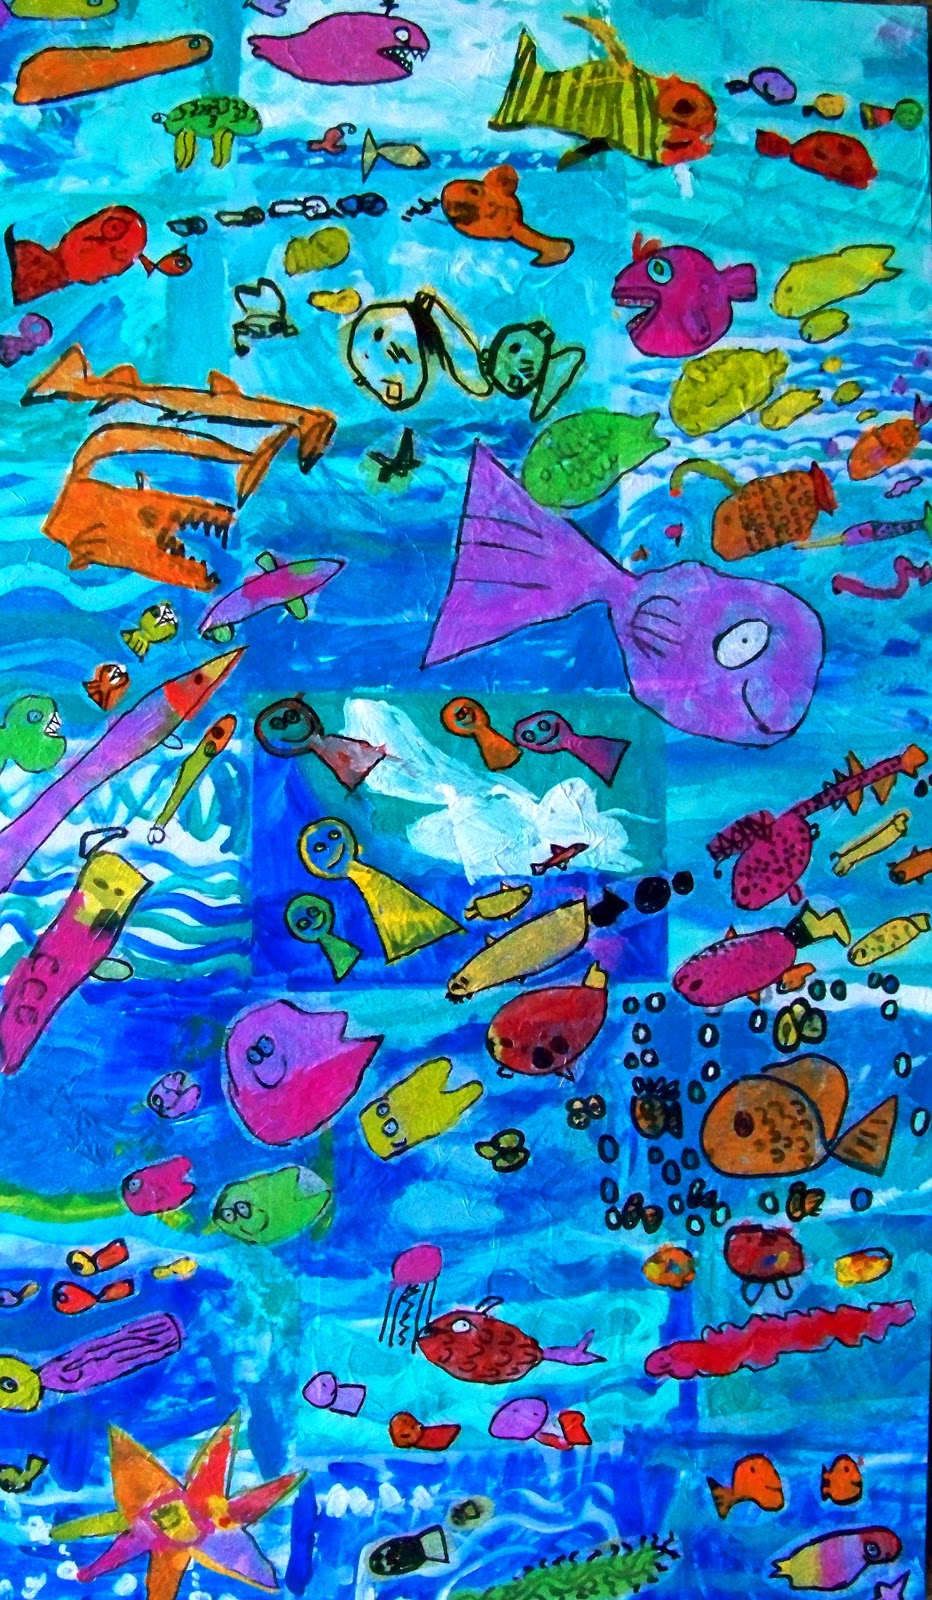
They turned out so beautiful and bright...

(10 years old)

(7 years old)

 Creating as a family!  (9, 11, & 13 years old)


What a wonderful Spring art project! I hope you enjoy these as much as I do. Look for my next tissue paper art project with our family...

. . . . . . . . . .
I will try to post as much as I can with a new baby, but his time is the most important right now.


February 19, 2013

Sneak Peek: Acrylic on Tissue

My family had a very fun weekend visit with a very cool family... and of course we had to make an art project with the kiddos!

With this art project, they used white tissue paper, pencils, permanent markers and paint. The kids picked their own theme.  Let's see what they came up with... later next week!


Beavers, owls, deers, trees... Oh my!


Tune in later next week...


November 02, 2012

A swarm of Sea Creatures! -tissue paper & paint {tutorial}


This is one of the most beautiful collaborative art projects that the kids have created yet! I absolutely love the way their adorable fish are swimming in the gorgeous blue ocean water...
There were 4 - 1st grade classes, with 80+ kids who collaborated. We used tissue paper & acrylic paint to produce this lovely, colorful artwork that hangs in their hallway. 

There are so many joys I receive & give from volunteering my time to help create art for these kids. One is that 2 of them are my own kids and knowing their excitement and appreciation. Another is seeing all of the kids in each grade so thrilled and proud of their artwork-that they contributed to such amazing artwork hanging in their halls. It does not matter the level of artistic ability or even capability each child has, but that each one has contributed and they are just as awesome as the others! An additional aspect I enjoy about creating art with the kids, is that any of our projects can be made at home in a smaller version.


Here's how we did it {tutorial}:

    Items you will need:
  • white tissue paper
  • various acrylic paint colors
  • black permanent marker
  • Mod Podge (and a brush)
  • 3 canvas or wood panels (white)


  • On a tissue paper I had them draw with pencil, then outline with permanent marker, and then paint their fish. They could fill up their paper with many sea creatures, or a few large ones, whatever they desired.
  • On a separate tissue paper they painted with several hues of blue for ocean water, some with waves, or bubbles or splashes...


  • I spread out the ocean water pieces, darker on the bottom and lighter towards the top. I then Mod Podged the water onto the canvases, overlapping each other a little. I had to work quickly because the tissue paper rips if you wait too long. Dry time is 20 min.
  • Next, I cut out each of their fish and Mod Podged onto the ocean water. I clustered their own fish near each other so they would be able to recognize all of their artwork together.

Just little ol' first-graders...


their imaginations...


and fish...


Look at mine!


Amazing KIDS
Amazing TALENT
Amazing ART


I do NOT SPAM! You won't be sorry when you get the SUPER SECRETE SALES & SNEAK PEEKS!

Thank you for stopping by 


September 26, 2012

sneak peek of our 1st grade art mural... FISH in the OCEAN!

Take a look at our incredibly creative and lovely art created by 1st graders! I have started with the 1st grade (80+ kids) this year for our school collaborative art murals that decorate the halls.  Each class has spent a little over an hour drawing and painting acrylic on tissue paper(Eric Carle inspired) to create:

1. Fish and Sea Creatures
&
2. Ocean Water


I can't wait to see when it's all together! I'll keep you posted... There will be many more coming!


Aren't these so adorable?
(ages 6-7 years old)